When your LiftMaster garage door opener is not functioning properly, a simple reset might be necessary to restore its functionality. Performing a LiftMaster garage door reset can help resolve issues, such as unresponsive remotes, keypads that aren’t working, or problems with the garage door opener itself. A reset essentially wipes the memory of your opener, allowing you to reprogram your remotes and keypads as needed, giving your garage door system a fresh start.
In this guide, we will walk you through the step-by-step process of performing a LiftMaster garage door reset. We will cover the tools you need, the different types of resets based on specific models, and troubleshooting tips if you encounter any issues. Whether you’re a seasoned DIY enthusiast or a homeowner looking to resolve a simple problem, this comprehensive guide will provide everything you need to know about resetting your LiftMaster garage door opener.
What is a LiftMaster Garage Door Reset?
Understanding the Purpose of a Reset
A LiftMaster garage door reset involves returning the garage door opener to its factory default settings. This action clears the memory of all programmed remotes, keypads, and other devices linked to the opener. The purpose of a reset is to resolve any operational issues that may arise from corrupted memory, syncing problems with remotes or keypads, or when you want to reconfigure your system after a change in ownership or access.
Resetting your LiftMaster garage door opener is straightforward and can be done in a few minutes. However, after performing a reset, you will need to reprogram all your devices, including remotes and keypads, to ensure they sync correctly with the opener.
When Should You Perform a LiftMaster Garage Door Reset?
There are several situations where performing a LiftMaster garage door reset may be necessary:
- Unresponsive Remote or Keypad: If your remote control or keypad is not working, resetting the garage door opener can help clear any issues and allow you to reprogram the devices.
- Lost or Stolen Remotes: If a remote control is lost or stolen, performing a reset will erase the remote from the opener’s memory, preventing unauthorized access.
- New Home Purchase: If you’ve recently purchased a new home with an existing LiftMaster garage door opener, resetting the opener is a good practice to ensure only you have access.
- Technical Glitches or Errors: If your garage door opener is experiencing operational glitches or errors, a reset can clear the memory and resolve these issues.
- Reprogramming After a Power Outage: Power outages can sometimes cause issues with the programming of your opener. Resetting can restore normal functionality.
How to Perform a LiftMaster Garage Door Reset
Step-by-Step Guide for a Standard LiftMaster Garage Door Reset
Performing a LiftMaster garage door reset is a simple process that can be completed in a few easy steps. Here’s how to do it:
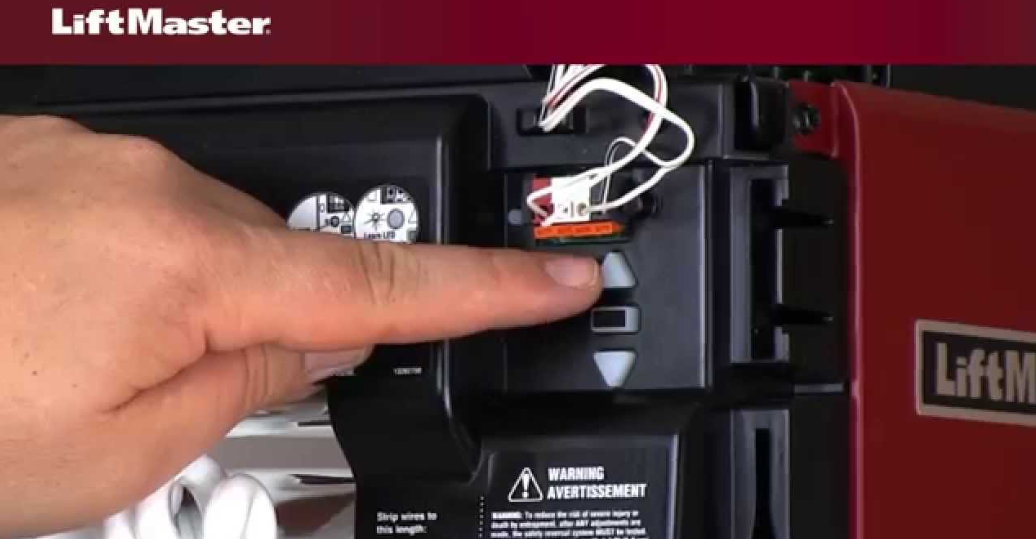
- Locate the “Learn” Button: The first step in performing a LiftMaster garage door reset is to locate the “Learn” button on the garage door opener motor unit. This button is usually found on the back or side of the motor unit and is colored red, orange, yellow, or purple, depending on your model.
- Press and Hold the “Learn” Button: Once you’ve located the “Learn” button, press and hold it for approximately 6 seconds. The indicator light next to the button will turn off, signaling that the opener’s memory has been erased. This action will clear all programmed remotes, keypads, and other devices from the opener’s memory.
- Release the “Learn” Button: After the indicator light turns off, release the “Learn” button. This completes the reset process. Your LiftMaster garage door opener has now been reset to its factory default settings.
- Reprogram Your Devices: After completing the LiftMaster garage door reset, you will need to reprogram your remotes, keypads, and other devices. To do this, press the “Learn” button again and then press the button on your remote control or keypad that you want to program. The indicator light will blink to confirm that the device has been successfully programmed.
Resetting the MyQ Garage Door Opener
If you have a LiftMaster garage door opener equipped with MyQ technology, you will need to reset both the opener and the MyQ system:
- Reset the Garage Door Opener: Follow the standard reset steps mentioned above to reset the garage door opener.
- Reset the MyQ Hub: Unplug the MyQ Hub and wait for 10 seconds. Then, plug it back in. Press and hold the “Settings” button on the MyQ Hub until the blue light begins to blink, indicating that the Hub has been reset.
- Reconfigure the MyQ System: Open the MyQ app on your smartphone and follow the on-screen instructions to reconfigure the MyQ system and sync it with your garage door opener.
Troubleshooting Common Issues After a LiftMaster Garage Door Reset
Even after performing a successful LiftMaster garage door reset, you may encounter some issues. Here’s how to troubleshoot common problems:
Remote or Keypad Not Responding After Reset
If your remote or keypad is not working after the reset, try the following:
- Reprogram the Device: Make sure you have followed the correct steps to reprogram the device after the reset. Refer to your user manual for specific programming instructions.
- Check the Battery: Ensure the battery in the remote or keypad is fresh and installed correctly. Weak or dead batteries can prevent the device from working properly.
- Ensure Proper Range: Make sure you are within range of the garage door opener when trying to reprogram the remote or keypad.
Garage Door Opener Still Unresponsive
If the garage door opener is still unresponsive after the reset, consider these solutions:
- Check the Power Supply: Ensure the garage door opener is plugged in and receiving power. Test the outlet with another device to confirm it is working.
- Inspect the Safety Sensors: Make sure the safety sensors are aligned correctly and free of debris. Misaligned or dirty sensors can prevent the door from closing.
- Examine the Circuit Board: If the opener is still unresponsive, there may be an issue with the circuit board. Contact a professional technician for further assistance.
Benefits of Performing a LiftMaster Garage Door Reset
Enhanced Security
One of the primary benefits of performing a LiftMaster garage door reset is enhanced security. Resetting the opener clears all programmed remotes and keypads from its memory, ensuring that any lost or stolen devices no longer have access. This is particularly important if you have recently moved into a new home or if you’ve shared your garage access with multiple people.
Improved Functionality
A reset can improve the functionality of your garage door opener by clearing any corrupted memory or software glitches that may be affecting its performance. This can resolve issues such as unresponsive remotes, malfunctioning keypads, or operational errors, restoring the smooth operation of your garage door system.
Simplified Reconfiguration
If you need to reconfigure your garage door opener for any reason—such as adding a new remote, changing access codes, or integrating new devices—a LiftMaster garage door reset provides a clean slate to start from. This simplifies the process of reprogramming and ensures all devices are correctly synced with the opener.
Tips for Maintaining Your LiftMaster Garage Door Opener After a Reset
Regular Inspections and Maintenance
To keep your LiftMaster garage door opener running smoothly after a reset, regular inspections and maintenance are essential:
- Inspect the Moving Parts: Regularly inspect the chain, belt, rollers, and hinges for signs of wear and tear. Replace any worn or damaged parts promptly to avoid further issues.
- Lubricate Moving Components: Apply a high-quality garage door lubricant to the moving parts of your opener to reduce friction and prevent wear. Lubricate the chain or belt, rollers, and hinges as needed.
- Test the Safety Features: Periodically test the safety sensors and auto-reverse mechanism to ensure they are functioning correctly. Place an object in the door’s path and attempt to close it to see if it reverses upon contact.
Update Your Garage Door Opener’s Firmware
Some newer models of LiftMaster garage door openers may have firmware that can be updated to fix bugs and improve performance. Check your user manual or the LiftMaster website to see if updates are available for your model.
- Download the Firmware Update: Visit the LiftMaster website and download the latest firmware update for your opener model.
- Follow the Update Instructions: Follow the instructions provided on the website to update the firmware. This may involve connecting the opener to a computer or using a special programming tool.
- Test the Opener After Updating: After updating the firmware, test the opener to ensure it resolves any issues and enhances performance.
Consider Professional Maintenance
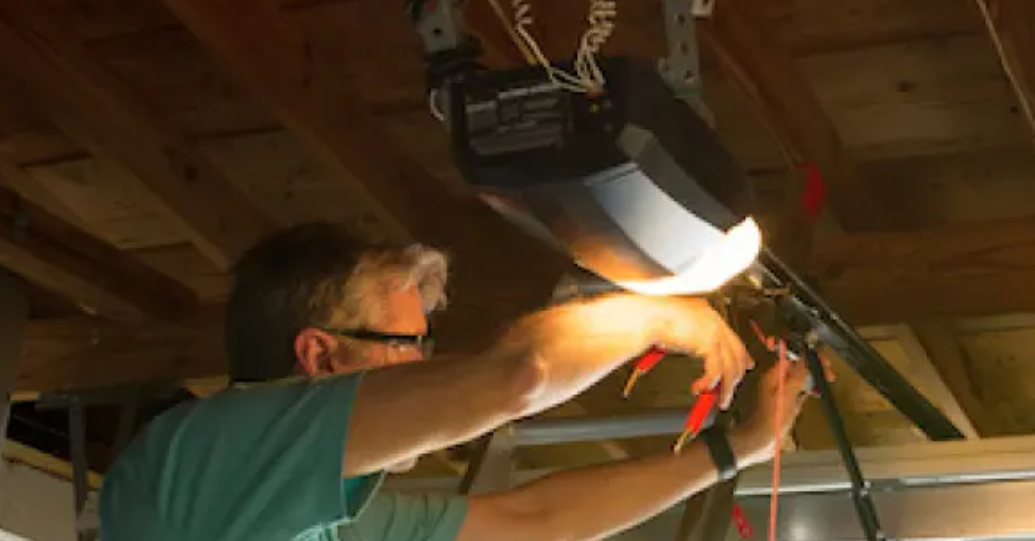
While routine DIY maintenance can help keep your garage door opener in good working condition, there are times when professional assistance is necessary. Scheduling regular professional tune-ups can help address minor issues before they develop into significant problems, ensuring the longevity and reliability of your opener. Additionally, if you encounter complex problems, such as circuit board issues or malfunctioning sensors, hiring a professional technician to handle these repairs requires specialized expertise.
Frequently Asked Questions
- How to set up a garage door opener LiftMaster?
- Setting up a LiftMaster garage door opener typically involves mounting the opener unit to the ceiling of your garage, installing the door control and safety sensors, and connecting the opener to your garage door. Once the physical setup is complete, power the unit and program it by pressing the “Learn” button on the opener and then pressing the button on your remote control until the opener’s light blinks, indicating successful pairing. Refer to the specific model’s manual for detailed instructions, as installation can vary slightly between models.
- Why is my LiftMaster garage door not responding?
- If your LiftMaster garage door is not responding, it could be due to several issues such as a lack of power (check to ensure the unit is plugged in and that no fuses are blown), misaligned safety sensors (ensure nothing is blocking them and they are aligned correctly), or remote control issues (check battery life and reprogram if necessary). If these checks don’t solve the problem, the issue may be more technical, such as a faulty circuit board, requiring professional assistance.
- How do I resync my LiftMaster garage door opener?
- To resync your LiftMaster garage door opener, first erase all existing codes by pressing and holding the “Learn” button on the opener until the LED turns off (about 6 seconds). Then, press the “Learn” button again briefly to re-enter programming mode. Immediately press the button on your remote until the garage door opener’s light blinks, indicating it has been successfully reprogrammed. Repeat for each remote or keypad.
- How do I program my LiftMaster without the learn button?
- If your LiftMaster model lacks a “Learn” button, it may require a different programming method, such as using DIP switches inside the remote and the opener to set a matching code. Locate the DIP switch panel in both devices, set the switches to identical positions, and test the remote. Refer to your model’s manual for specific instructions as older models vary significantly in programming techniques.
- How do you align a LiftMaster garage door opener?
- Aligning a LiftMaster garage door opener primarily involves adjusting the safety sensors located at the bottom of each side of the garage door frame. Make sure the sensors are facing each other directly across the sides of the door, with no obstacles between them. You can adjust their position by loosening the mounts and gently moving the sensors until their LED lights indicate they are aligned (one light will stop blinking and remain steady). Tighten the mounts to secure them in place. Proper alignment ensures that the sensors can detect any obstructions and prevent the door from closing on objects or people.
Conclusion
Performing a LiftMaster garage door reset can quickly and effectively solve a range of common garage door opener problems. Whether you’re dealing with a malfunctioning remote, unresponsive keypad, or sensor issues, a reset can help clear the system and restore proper operation. Following the steps outlined in this guide and maintaining your garage door opener regularly ensures it continues to operate smoothly and securely.
For those needing professional assistance with their garage door opener or prefer an expert touch, consider contacting DoorJam Garage Repair. We specialize in all aspects of garage door services, including the Liftmaster garage door reset. Our experienced technicians are equipped to handle any issue and ensure your garage door system functions flawlessly. Contact us today for reliable and efficient service.
End Note
DoorJam Garage Repair is your trusted partner for quality and affordable garage door services in Raleigh-Durham and the surrounding areas. With a team of skilled professionals and years of experience, we are dedicated to providing exceptional service that meets all your garage door needs. Learn more about our commitment to excellence and customer satisfaction on our About Us page. We offer a wide range of garage door services, from routine maintenance to emergency repairs, ensuring your garage doors function smoothly and securely. Our expertise and prompt response make us the go-to choice for reliable garage door solutions.
Serving Raleigh-Durham and beyond, DoorJam Garage Repair is committed to delivering high-quality services in every community we serve. Explore our extensive service areas, including Durham, to see how we can support your garage door needs. We focus on a customer-centric approach, providing personalized solutions and professional service that you can rely on. Ready to schedule a service or need more information? Visit our Contact Us page to get in touch with our friendly team. Choose DoorJam Garage Repair for all your garage door repairs, maintenance, and installation needs, and experience the difference that quality service makes.